Prototyping isn’t a step in the design process; prototyping is the design process. And as InVision continues to become one of our preferred applications to drive this process, we’re sharing some insights on how to create a more perfect InVision workflow. Why? Because better prototyping makes for better products.
Here are seven steps to a more perfect InVision workflow…
#1: Start Early
Designers often treat prototyping as a discrete step in the process. It often comes after the visual design stage is complete. But to get the most value out of your prototype, start thinking about it as soon as you open your first blank Sketch wireframe document. That’s right… start prototyping with wireframes. This allows you to always evaluate flows rather than flat screens in a vacuum. It also helps you squash weird workflow problems early on, before they become showstoppers.
#2: Use InVision Sync
InVision Sync allows your prototype to update every time you save your Sketch file. There’s no export step, and fewer steps mean less friction. (Full disclosure: InVision Sync can be fairly temperamental sometimes, but even on a bad day, it still beats exporting screens manually).
Pro Tip: If you use a service like Dropbox to store files, you can point InVision to that location and it will sync up with your latest file. No more buried “source files” folders that are separate from all of your other work.
#3: Stub Your Files
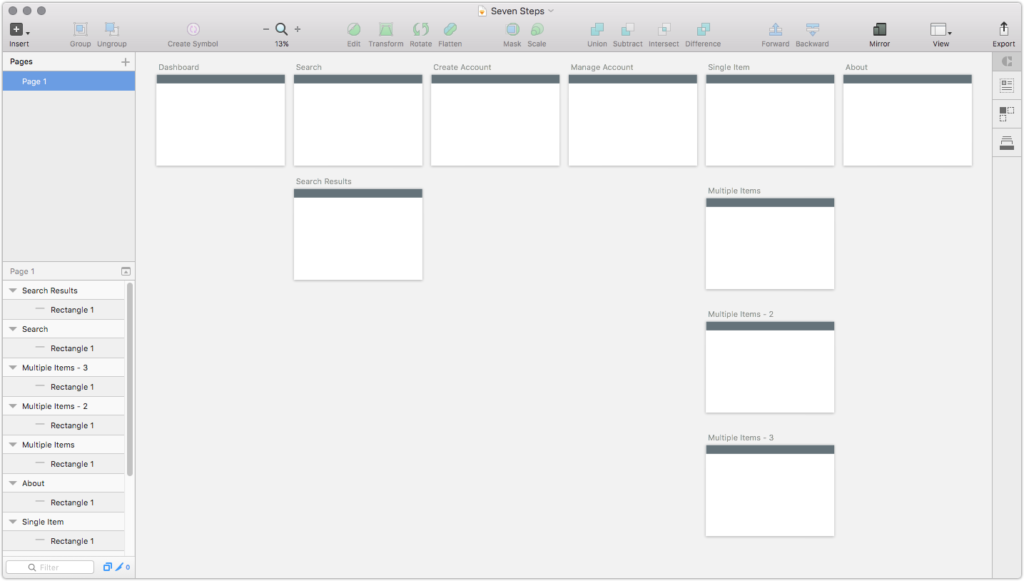
One major “gotcha” of working with InVision Sync is… well, it’s not really “sync.” It exports your artboards whenever you save your Sketch file, then imports those artboards into your InVision project. It’s a one-way process, so any changes you make to your files in InVision (like renaming or deleting them) won’t be reflected in your Sketch file. Take a moment at the start of your project to stub your file out. Set up pages for the different main sections of your app, artboards for the different screens in each section, and—this is the important part—name them consistently before you add your Sketch file to your InVision project. Now your prototype will be free of ghost screens or screens named “Desktop HD 2,” and the rational, organized part of your brain will thank you.
#4: Connect the Dots
Now that you have all of the screens in your InVision prototype, you can start linking them up with hotspots as soon as you create the clickable areas in your design, rather than doing one screen at a time and wiring them all up at the end. This makes it easy to link as you go, and lets you see any potential flow problems early on. To save time, you can use hotspot templates, which allow you to reuse groups of hotspots on multiple views in your app. Create one for your main nav, one for your footer, one for forms, etc., and just apply them to screens as you go. You can even apply them to multiple screens at once to really speed up your workflow.
#5: Annotate as You Go
InVision offers four different types of annotations: comments, private comments, notes and tour points. Comments are obviously helpful for collecting client, user and stakeholder feedback, but tour points allow you to annotate your design as you go and guide viewers through, step-by-step.
This is helpful when you’re not able to present a prototype.
#6: Fork Your Wireframe When it’s Time for Visual Design
Rather than starting over when you’re ready to move from wire framing to visual design, just Copy your prototype. This will create a duplicate version of the project, complete with hotspots and overlays intact, ready for visually design in Sketch. (It doesn’t copy comments over, so if you’ve established tour points, you’ll have to recreate those.)
#7: Sharing is Caring
InVision offers some great ways to present and share your work. The default Share is fairly robust and gives many granular options, but Liveshare is where InVision really shines. Just provide your client or stakeholder with a Liveshare link, and they can watch you navigate through the prototype on their own screen, add comments, mark up screens and more. (Bonus: you can even download an HTML version of the prototype for archiving or to share on your own server.)
Building a digital product?
This workflow is all about starting the prototyping process earlier. Why start prototyping early? The sooner you start prototyping, the sooner you can collect actionable feedback from stakeholders and users. Everything that happens prior to prototyping is you just talking to yourself. These tips can get you prototyping faster.